5-Minute Quick Start
This guide follows the shortest safe path from an imported package to a working Play Mode test.
The five-minute estimate starts after Unity has finished importing the package and compiling shaders. The first import can take longer depending on the project and PC.
1. Check the project
- Open the Unity project that contains your VRChat avatar.
- Back up the avatar Prefab or project.
- Confirm that the Console has no existing compile errors.
- Confirm that Modular Avatar is installed.
- If updating from v1.0.0–v1.0.2, follow the v1.1 update procedure. Do not Uninstall first or delete the existing
RealSweatobject orAssets/CookiTools/Generated.
2. Import the package
Import the UnityPackage for the product you purchased:
- Base Module for skin sweat
- Effects Module for falling drops, floor stains, breath, and steam
- Both packages for Full Pack (Base + Effects), the complete configuration
When using both modules, keep Base and Effects on the same version. v1.0.x and v1.1.x modules cannot be mixed; Setup and avatar build intentionally stop on a version mismatch.
3. Open Setup
From the Unity top menu, open:
CookiTools > RealSweatSystem Setup/Uninstall
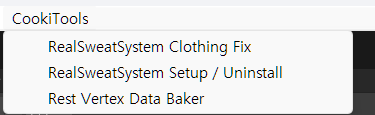
Open Setup from the CookiTools menu. Click an image in this guide to enlarge it.
Keep the Install tab selected, then assign:
- Avatar — the avatar root with the
VRCAvatarDescriptor. - Body Mesh — the skin-side
SkinnedMeshRenderer. - Body Elements — the material Elements/submeshes that represent the skin.
- Select a child Hierarchy object with a valid skin-side
SkinnedMeshRenderer. This field does not accept an.fbxor Mesh asset from the Project window. - Select only the skin Elements that should receive surface sweat. Confirm the material name instead of assuming Element 0 is correct.
- The primary Body Renderer is the scale and default emission reference.
- Additional
SkinnedMeshRenderertargets such as a separate Face are available as an experimental option. Leave them empty for the first test. - Effects-only installation still needs the Body Mesh as the particle emission surface, but it does not modify the Body mesh or material.
Use Detect if needed. If auto-detection selects the wrong Renderer, drag the correct Body object into Body Mesh manually.
4. Review the initial settings
For a new installation, the full Setup defaults are:
| Setup label | Default |
|---|---|
| Automatic render order (Recommended) | On |
| Sweat Render Queue | 2455 |
| Follow Body Shadow Strength | On |
| Wet Skin Gloss as Sweat Increases | On for a new installation; updates preserve the installed material state |
| Overall Sweat Amount | Low amount (Low Load) |
| Auto Mode | On |
| Auto Mode Sensitivity | Balanced — recommended motion-proportional response |
| Install 3D Feature (Tessellation) (High Load) | Off |
| 3D Detail Precision | Simplified — General Play; used only when 3D support is installed |
| Tessellation Default On | Off; used only when 3D support is installed |
| Full-Quality Body Sweat in Mirrors | Off |
| Falling Drops | On when Effects is installed |
| Enable Floor Stains | On when Effects is installed |
| Breath Puffs | On when Effects is installed |
| Steam | On when Effects is installed |
| 3D Particle Quality | Off; lightweight 2D particles are used |
| Water Drop Impact Splash | On only while 3D Particle Quality is selected |
| Body Steam in Mirrors | Low for a new installation |
| Show My Breath in First Person | Off |
| Install Steam & Breath Intensity Radial | Off |
| Steam Locations | Chest Hollow, Shoulders, Armpits, and Thighs On; Crotch and Feet Off |
With automatic render order, the selected Body material must use Render Queue 2454 or lower. Leave these defaults unchanged for the first test unless your avatar requires a documented exception.
Leave Install 3D Feature (Tessellation) (High Load) off. No Tess is the normal low-load configuration and is enough to verify the system.
5. Install or update
Review the selected avatar, Body Mesh, Body Elements, and optional additional targets, then press Setup — Install / Update. Wait for Unity to finish before interacting with the project.
If the tool reports missing tangents, choose Create Safe Copy (Recommended). This creates a RealSweat-only mesh copy and leaves the source model import settings unchanged.
Setup is complete when the tool reports a successful installation and Unity has finished importing the generated assets. Check the Console for new errors before entering Play Mode. Gesture Manager and ordinary Scene/Play Mode are preliminary checks; complete a VRChat Build & Test before the final upload.
6. Test in Play Mode
Use Gesture Manager or another preview method:
- Open the avatar menu and turn Sweat Display on.
- Auto Mode is on by default. Turn it off temporarily for the manual test.
- Move Sweat % through 0%, 25%, 50%, 75%, and 100%.
- Turn Auto Mode back on and compare tracked body movement with standing still.
- Open Effects and check the installed particle controls.
- Open Reduce Load and check Hide Surface Sweat, Remote Low Load, VRC Light Volumes, Only Visible to Me, and the optional Droplet Depth control.
- Confirm that facial expressions and existing avatar controls still work.
- Sweat Display on + Sweat 0% keeps the system ready. This is different from turning Sweat Display off.
- Manual Mode and Auto Mode use the same Sweat % value. Switching modes preserves the current value.
- Auto Mode intentionally ignores WASD locomotion and jumping. Use tracked body movement such as dancing or torso motion when testing it.
- Breath Puffs normally start above about 25% Sweat while the mouth is open. They are intentionally hidden from the wearer's first-person camera.
- Steam normally begins fading in at about 30% Sweat.
To remove Real Sweat System, do not delete the RealSweat object or Assets/CookiTools/Generated directly. Use the official Uninstall procedure.
What to read next
- Learn how Manual and Auto Mode share one value in Manual Mode & Auto Mode.
- Adjust appearance and automatic response in Tuning Guide.
- Review particle thresholds and facial input in Effects Guide.
- If the result differs from this test, use the symptom links in Troubleshooting.